Ran into an issue with a customer server where various things were just not working. A reboot always fixed it, but it had to be done every few days which was not acceptable. The types of errors being received were things like "no logon servers are available" or being unable to open any Active Directory tools. DNS and network shares were working fine, i could RDP in without issues, restarting various services did not help, ICMP/UDP were fine. I attempted to telnet out but any outgoing connection was immediately aborted, wireshark did not see the connection attempt, all firewalls were off.
I ended up putting PuTTY on the server and tried to telnet from there, and received a more specific "no buffer space available" error. Searching for that, i determined it was a Winsock error related to not enough free handles being available. With that knowledge, i opened the task manager and added the Handles column and sorted. There it was, an HP Plotter utility service with 6000+ open handles. I killed the process and everything immediately went back to normal.
Monday, February 9, 2015
Tuesday, October 28, 2014
Fortigate SSL Inspection with Custom CA Certificate
This was tested on a 30d, 60c, and 60d, so i assume it will be fairly accurate for most Fortigate units. When you enable SSL inspection in a policy, the unit will begin proxying all SSL traffic through itself so that it can see the actual traffic. The way that it does this is it has a CA certificate installed and upon visiting a site it will on the fly generate a new certificate for that website and sign it by itself. This works well because you still have the protection of the certificate not matching the site you're visiting, being expired, etc. The downside is that you have to install Fortigate's CA certificate into your trusted root certificate store on all client computers in order for the certificates to be accepted. For the very security conscious folk, you will note that this CA cert shares the same private key across all Fortigate units. So a nefarious person could potentially extract the private key and begin signing certificates with it for a targeted MITM attack. Unlikely, yes, however it's not hard to generate a new certificate to remove this potential issue.
Generate the certificate
To start you will need a computer that has openssl installed, i typically use a linux VM but anything will do. Start by generating a new CA private key, when prompted for a pass phrase enter something secure and that you will remember (you will only need it a few times).[mike@mon1 ~ ]# openssl genrsa -aes256 -out ca.key 4096 Generating RSA private key, 4096 bit long modulus ............................++ ...........++ e is 65537 (0x10001) Enter pass phrase for ca.key: Verifying - Enter pass phrase for ca.key: [mike@mon1 ~ ]#Next, sign the certificate. Fill in the information as you see fit, it is not really important for what we're trying to accomplish here. This is set for 3650 days, you can raise/lower this if you want.
[mike@mon1 ~ ]# openssl req -new -x509 -days 3650 -key ca.key -sha256 -extensions v3_ca -out ca.crt
Enter pass phrase for ca.key:
You are about to be asked to enter information that will be incorporated
into your certificate request.
What you are about to enter is what is called a Distinguished Name or a DN.
There are quite a few fields but you can leave some blank
For some fields there will be a default value,
If you enter '.', the field will be left blank.
-----
Country Name (2 letter code) [AU]:US
State or Province Name (full name) [Some-State]:California
Locality Name (eg, city) []:City
Organization Name (eg, company) [Internet Widgits Pty Ltd]:Company
Organizational Unit Name (eg, section) []:
Common Name (eg, YOUR name) []:Company Fortigate CA
Email Address []:support@company.com
[mike@mon1 ~ ]#
Install the certificate
- Transfer the ca.key and ca.crt files that you generated to your local computer. These are just text files, so you could potentially copy/paste the contents if that's easier.
- On your fortigate you will need to enable the Certificate feature (Config - Features, or the Features panel on the Dashboard).
- Navigate to System > Certificates > Local Certificates and select Import
- Set the Type to Certificate, browse to the paths of the certificate file (ca.crt) and key file (ca.key) and enter the password you specified earlier.
- Once the import is complete, navigate to Policy > SSL Inspection and select the new certificate and press Apply.
- Enable SSL inspection on the policies of your choosing (typically this would be your internal to wan policies)
- You can test that it's working by visiting an SSL website such as https://google.com and inspecting the certificate chain. You should see your CA at the top of the list and then the certificate for the site that was generated on the fly. Note that some browsers such as chrome will cache the certificate info, so you may need to force refresh a few times.
- At this point in time you are probably still seeing certificate errors, so read the next sections to resolve that
Installing the root CA to PCs by hand
To install the CA certificate to your PC by hand, you just need to add the ca.crt file to the Trusted Root Certificate Store.- Browse to the path of the ca.crt file
- Right click on the file and select Install Certificate
- Select Local Machine as the store location
- Select Place all certificates in the following store, press Browse, and select the Trusted Root Certification Authorities entry
- Press Next and then Finish and you should be done
- You can test by repeating the browser test, the certificates should now show up green
Installing the root CA to PCs via Group Policy
This obviously only applies to Active Directory environments, but it is a very easy way to get it pushed out.- Either edit an existing policy or create a new one, this will be applying to computers (not users)
- Navigate to Computer Configuration > Policies > Windows Settings > Security Settings > Public Key Policies > Trusted Root Certification Authorities
- Right click to import the ca.crt, press Next and Finish
- A gpupdate /force will allow the computers to pull in the new certificate. Even if it prompts you to log off, you don't need to for it to work
- You can test by repeating the browser test, the certificates should now show up green
Tuesday, September 23, 2014
Mitel SX-200 Hotline Phone
On a Mitel SX-200 system, it's a little obscure but still possible to take an analog extension and have it automatically call a predefined number when it goes off hook. This is useful for a lobby or door phone, and especially useful for a security door phone that doesn't have buttons on it. To do this you just need to create a new COS (form 3) for the phone(s), enable option 228 (Manual Line), and assign that COS to the phone. Once the phone goes off hook, it will immediately ring the operator. To enable option 228 you will probably have to show disabled options and enable it.
Tuesday, May 6, 2014
Exchange 2010 and "Multiple MAPI public folder trees were found" error
A customer in an Exchange 2010 environment was giving the error "Multiple MAPI public folder trees were found" on both IPM_SUBTREE and NON_IPM_SUBTREE. This error is commonly reported as being a problem with multiple instances of "CN=Public Folders" under the Public Folder Hierarchy key in ADSI Edit. This was not my problem, however i will list both solutions. Note that i did not need to restart my Information Store service(s) for this to start working again, but not all environments are the same.
Open ADSI Edit
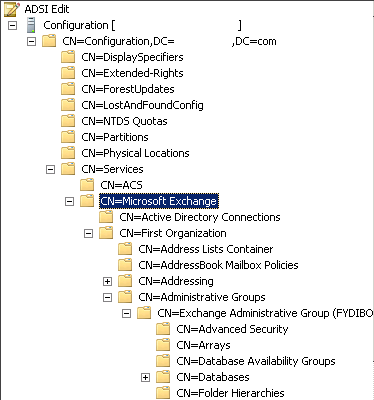
This needs to be done on a machine with adsiedit.msc, usually a domain controller will work fine. After opening it, you need to connect to the Configuration context. Once connected, drill down to Configuration, Services, Microsoft Exchange, <Your organization name, typically Microsoft Exchange>

Solution 1
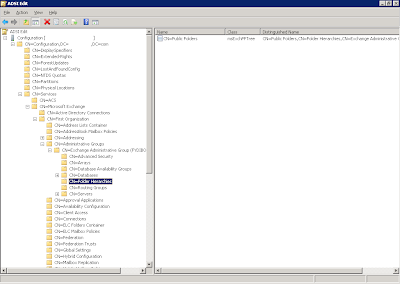
Continue drilling down into Administrative Groups, <Your administrative group name, typically Exchange Administrative Group>, Folder Hierarchies
Once here, you should see an entry for CN=Public Folders. If you see more than one, there is one that either needs to be deleted, or you need to edit the attributes and set msExchPFTreeType to 0 (this is slightly safer).

Solution 2
If solution 1 didn't work, this may be your problem. As it turns out for this customer they had an Exchange 2000 environment a long time ago that they "had a hard time removing". With those comforting words, i looked elsewhere and found this.
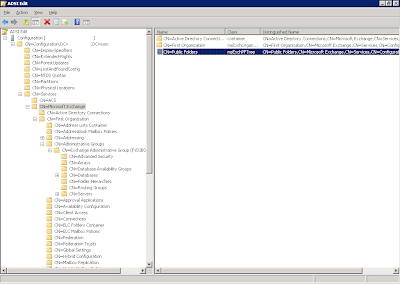
Still in adsiedit.msc, but in the Microsoft Exchange key, look for a CN=Public Folders entry. Chances are this is the one that you need to delete or set msExchPFTreeType to 0. You cannot just rename the object, it will still be detected as a msExchPFTree type.

Thursday, February 6, 2014
Fortigate 40c and Redundant Internet Connections
Update: This article is pretty old at this point, it's only going to apply to older firmware and devices. That said, the concept is pretty much the same, just in different places.
If you're reading this, you're probably not very satisfied with how up to date Fortinet keeps their documentation for newer software versions. In previous versions, you could for the most part configure dual ISPs through the web interface, but on newer releases you have to use the CLI to do it.
The scenario:
ISP 1 is on wan1, your IP is 1.1.1.2, gateway is 1.1.1.1
ISP 2 is on wan2, your IP is 2.2.2.2, gateway is 2.2.2.1
This configuration will be set up in a primary/secondary failover mode, i will not be doing load balancing
On newer firmware, this is replaced with link monitoring:
If you're reading this, you're probably not very satisfied with how up to date Fortinet keeps their documentation for newer software versions. In previous versions, you could for the most part configure dual ISPs through the web interface, but on newer releases you have to use the CLI to do it.
The scenario:
ISP 1 is on wan1, your IP is 1.1.1.2, gateway is 1.1.1.1
ISP 2 is on wan2, your IP is 2.2.2.2, gateway is 2.2.2.1
This configuration will be set up in a primary/secondary failover mode, i will not be doing load balancing
1. Setup gateway detection on wan1
This section tells the firewall to ping an IP (in this case, our gateway) repeatedly to see if it's alive or not. For most cable and DSL type connections this will work fine, however if you are interfacing with another ISP's router that may continue responding to pings even if the circuit is down, then consider using an internet IP such as 4.2.2.2 or 8.8.8.8. You can do this on both wan interfaces if you want it to fail both directions.
config router gwdetect
    edit 1
        set interface "wan1"
        set server "1.1.1.1"
    next
end
On newer firmware, this is replaced with link monitoring:
config system link-monitor
    edit "wan1 check"
        set srcintf "wan1"
        set server "1.1.1.1"
        set gateway-ip 1.1.1.1
        set timeout 5
        set recoverytime 1
    next
end
2. Configure your interfaces
Most of this can be done in the web interface, the only critical piece here are the two fail-detect options on wan1. You can also turn on failure detection for wan2 (make sure you add a gwdetect for it as well), however i don't find it necessary here since if both wan1 and wan2 are down then i'm screwed anyways. Note that the fail-detect options are not necessary on newer firmware.
config system interface
    edit "wan1"
        set ip 1.1.1.2 255.255.255.248
        set fail-detect enable
        set fail-detect-option detectserver
    next
    edit "wan2"
        set ip 2.2.2.2 255.255.255.248
    next
end
3. Configure your static routes
These can be done in the web interface, the important piece is to set the distance on wan2 to a higher value than wan1 so that wan1 is always the preferred route
config router static
    edit 1
        set device "wan1"
        set gateway 1.1.1.1
    next
    edit 2
        set device "wan2"
        set distance 20
        set gateway 2.2.2.1
    next
end
4. Configure Policies
This doesn't need to be done in the CLI, you just need to have an internal to wan1 allow/NAT rule, as well as an internal to wan2 allow/NAT rule. It will choose the proper rule based on which port the traffic is being routed through (the active internet connection). In case you want to see it in CLI, here it is:
config firewall policy
    edit 1
        set srcintf "internal"
        set dstintf "wan1"
        set srcaddr "all"
        set dstaddr "all"
        set action accept
        set schedule "always"
        set service "ALL"
        set nat enable
    next
    edit 2
        set srcintf "internal"
        set dstintf "wan2"
        set srcaddr "all"
        set dstaddr "all"
        set action accept
        set schedule "always"
        set service "ALL"
        set nat enable
    next
end
5. Test and confirm
At this point you should be up and running. You can check the status of the gateway detection using get router info gwdetect. You can also check the routing table status using get router info routing-table all.
It is important that when you do your testing you simulate a logical failure of the circuit so your wan1 stays "up". The easy way to do this is to unplug the carrier side of the equipment (unplug the coax for cable, phone line for DSL, T1/loops for T1/EoC/EoDS1, etc.)
6. VPN setup
If you have IPSEC VPN tunnels and want them to also follow the redundancy here, then there is a little more work to do. This is assuming you already have the tunnel set up on wan1. You would just create the tunnel identically on wan2, selecting wan2 as the local interface. Make sure both tunnels have DPD (Dead Peer Detection) turned on.
After setting up the second tunnel, you will add an IPSEC policy from internal to wan2 using the new tunnel configuration. You will of course have to configure the secondary tunnel on the other end as well. After doing this, the VPN should follow the active interface
7. Using VIPs on backup links
One small quirk, if your default route points out wan1 for example, but you want to have servers using Virtual IPs on wan2 while wan1 is still active, you need to do this:
config system settings
  set asymroute enable
end
This is necessary because the Fortigate will think traffic coming in over wan2 is spoofed unless the default route is pointing there. It would be preferable to leave this feature disabled but this is really the only way to accomplish having both circuits live at the same time.
Monday, January 20, 2014
Exchange 2010 to 2013 Migration - Public folders not accessible to migrated users
This was a fun one, due to the ridiculous public folder migration process that is required to go from Exchange 2010 to 2013, you are basically forced to have the two versions coexist for a while to get everything migrated. In the interim, i ended up having to have my 2013 Client Access Server proxy all connections back to the public folder database on my 2010 server (combo Hub/CAS/Mailbox). What i noticed was that i had a few limitations and quirks:
After quite a bit of troubleshooting, it was determined that the problem was the 2013 CAS was unable to proxy requests using RPC over HTTP to the 2010 CAS. There didn't seem to be a good reason for this, all certificates were good, internal/external URLs on all virtual directories specified properly, authentication methods configured properly, etc. Finally, this solution was found. I can't say for certain that this is the only fix required, however so far it has worked well for me.
The fix (run this on your 2010 CAS):
That's it. This is a setting that was always there on 2010 but was never needed before. Note that mail.yourdomain.com should be the CN (common name) of your certificate. You can get that, if you don't know it, by running Get-ExchangeCertificate -server 2010CAS and looking at the CN= section for the entry that has IP.WS. listed for services. The moment i did this, RPC over HTTP for all users started working, and public folder access was fixed.
- Users with mailboxes located on the 2013 Mailbox Server could not access public folders on the 2010 server, they received an error something along the lines of: Cannot expand the folder. Microsoft Exchange is not available. Either there are network problems or the Exchange server is down for maintenance.
- Users with mailboxes located on the 2010 Mailbox Server could not use RPC over HTTP (Outlook Anywhere) through the 2013 server.
- Users with mailboxes located on the 2013 Mailbox Server could use RPC over HTTP without a problem.
- All users could use OWA and Activesync
After quite a bit of troubleshooting, it was determined that the problem was the 2013 CAS was unable to proxy requests using RPC over HTTP to the 2010 CAS. There didn't seem to be a good reason for this, all certificates were good, internal/external URLs on all virtual directories specified properly, authentication methods configured properly, etc. Finally, this solution was found. I can't say for certain that this is the only fix required, however so far it has worked well for me.
The fix (run this on your 2010 CAS):
Set-OutlookProvider EXCH -CertPrincipalName msstd:mail.yourdomain.com
Set-OutlookProvider EXPR -CertPrincipalName msstd:mail.yourdomain.com
That's it. This is a setting that was always there on 2010 but was never needed before. Note that mail.yourdomain.com should be the CN (common name) of your certificate. You can get that, if you don't know it, by running Get-ExchangeCertificate -server 2010CAS and looking at the CN= section for the entry that has IP.WS. listed for services. The moment i did this, RPC over HTTP for all users started working, and public folder access was fixed.
Wednesday, June 12, 2013
ASA 8.4 and Hairpin NAT
I previously posted here about setting up Hairpin NAT on a Cisco ASA running version 8.2, but of course they changed the syntax yet again, so here is an updated version for 8.4. For those unaware, Hairpin NAT is what allows you to access a server by its public IP from inside the network. This is useful if you are not running split DNS or if you have needy users that want to be able to use the same IP wherever they are.
The procedure for this is actually a bit simpler, there are just a few commands required:
The object groups need to be separate so that you can apply different NAT rules to them. The first object group and the corresponding NAT rule is for the external access coming in, while the second set are the ones that allow the internal to internal traffic.
The procedure for this is actually a bit simpler, there are just a few commands required:
Allow the traffic to get turned around:
same-security-traffic permit intra-interface
Add the NAT rule for users without their own static mapping
object network obj_any_hairpin
 subnet 0.0.0.0 0.0.0.0

object network obj_any_hairpin
 nat (inside,inside) dynamic interface
Note that i separated these two blocks as that is how it usually appears in the config. The first block defines the object group, while the second one applies the NAT rule to it. This rule will match for any LAN users that do not have a static 1:1 mapping defined.
Add NAT rules for all static users
object network obj_10.10.10.10
 host 10.10.10.10
object network obj_10.10.10.10_hairpin
 host 10.10.10.10

object network obj_10.10.10.10
 nat (inside,outside) static 1.2.3.4
object network obj_10.10.10.10_hairpin
 nat (inside,inside) static 1.2.3.4
The object groups need to be separate so that you can apply different NAT rules to them. The first object group and the corresponding NAT rule is for the external access coming in, while the second set are the ones that allow the internal to internal traffic.
Subscribe to:
Posts (Atom)